Just when I thought this group couldn't be anymore fun, they throw a birthday party! A fiber artists' birthday party includes hand made cards and hand made hats of course... we are a group of artists after all and once a month we get to prove it by making stuff! Yay!
. . . . . . . . . . . . . . . . . . . . . . . . . . . . . . . . . . . . . . . . . . . . . . . . . . . . . . . . . . . . . . . . . . .
My little hat is going to be a mix of sex kitten and high class rooster feather. It all begins with a tiny bowl, an oval piece of cardboard, a small pair of scissors, and some cheap glue I found under the couch while looking for change.
So on the top picture you'll see that I cut open a small hole with the scissors in the center of the cardboard oval, and I also poked 4 holes on either side of the hole. Into these poked holes go two pieces of wire, or twisty ties in my case. I make a loop about the size of a quarter and twist the ends together. These wires will be attached to hair pins which will anchor the hat to my head.
In the photo below that picture, the bowl has been placed upside down over the hole in the cardboard and glued down. You'll notice that the twist ties are also inside the upside down bowl. The reason for this is simple, the bowl will soon be painted black, and the wires will be inside the bowl, hidden from view.
Now comes the fun part, accessories! Let me explain the bits and pieces I am recycling for use in my hat. The purple mesh is a bag that carried small tasty tangerines, and i'm about to cut it, spray paint it, and turn it into a sexy little veil to peek out from under my hat into the whole scary world.
To the left is a bit of black organza whose purpose is not yet known. Bellow this is a sparkly gold organza scrap whose origins as well as destination is relatively unknown as well.
And to the far right is a lovely piece of gold embroidered black organza which I plan to wrap arou d the plastic bowl as soon as it is painted.
So here we are cutting the sexy tangerine-holding purple mesh to an apropriate size. Notice that the cup and cardboard base have been spray painted black, perfect color for a birthday party!
The image below that shows how the mesh has been painted black to match the hat. Also, the golden embroidered black organza has been wrapped around the cup part of the hat and the excess organza is arranged along the back to help glam it up a bit.
As I was putting the finishing touches on my party hat, I heard Fernando crowing outside my window. Fernando is a handsome rooster who carries a bouquet of long shimmery black/green feathers just for my benefit. Not wanting to dissapoint him, I ran outside and gave chase. Sure enough Fernando obliged my whim and kindly gave me two long feathers free of charge. Now my party hat is finished, thanks Fernando!
7/24/19
4/26/19
This Year’s Theme: Recycling
The theme of this year’s Fiber Artists show is Recycling, and I definitely want to take on the challenge of creating a doll using previously worn textiles and articles given to me by others, such as the beads from a broken rosary and lace off an old skirt.
I started with some sari silk scraps I had stored for a special project. It is very hard to work small corners without ripping the material and I believe it will take a few dolls before I work out all the kinks!
In order to make the sari material stronger, I use a fusible interfacing from Pellon ( style# 911FF). I set my iron pretty hot, place the interfacing over the back side of the sari fabric, cover the interfacing with a light cotton material, and iron it. Then I draw my cat pattern on the interfacing and embroider the mouth in a nice dark color thread. I fold the sari in half and sew right on the line in a fun contrasting color thread, cut around it leaving a 1/4 inch seam allowance, carefully turn it inside out, and stuff it with fiberfill.
In order to make the sari material stronger, I use a fusible interfacing from Pellon ( style# 911FF). I set my iron pretty hot, place the interfacing over the back side of the sari fabric, cover the interfacing with a light cotton material, and iron it. Then I draw my cat pattern on the interfacing and embroider the mouth in a nice dark color thread. I fold the sari in half and sew right on the line in a fun contrasting color thread, cut around it leaving a 1/4 inch seam allowance, carefully turn it inside out, and stuff it with fiberfill.
Once they are all safely turned inside out and stuffed, I tuck in the bottom and sew them shut. Placing the eyes takes practice, and I like to pin them to the doll with tiny pins before I sew them on. Once I have them in place, I mark the spot with a black pen and sew the eyes on using invisible thread.
Using a long needle, I join the legs to the body. The trick is getting enough tension so that the arms and legs can move and keep their position. I like using a medium weight fishing line, one that's not too bulky and also won't break.
Once I manage to attach all the limbs for all the cats, I'm ready to put my Recycling Project together.
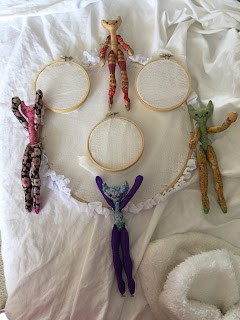
The top picture didnt look fun enough, the cats looked like they were just standing around. Once I sat them down on the mini embroidery hoops things started to look better. This had been my original idea, cats on embroidery hoops... because they look like planets, or at least the abstract sugestion of planets. But when my husband saw my work in progress, he sugested i use my recycled cardboard horses in the project too.
So i replaced a couple of sari cats with some recycled horses and took a poll. 4 out of 5 people prefered the horses to the cats, so horses it is. I really wanted more fun in there though, so i made some kitty riders for the horses. I also wrote the words out, you know, to drive the point home. I'm going to title this piece, Recycling Around the World.
Joining a Fiber Artists group
As they say... I have found my people.
Dallasfiberartists.org
11/28/18
8/29/17
Fox Doll
Since I have been infatuated with ballet for the last few years, it seems to show up in everything I make. Even these little fox dolls have long ballerina legs and thanks to a tripod design, they are able to stand on their own.
8/26/15
Stains, Underglazes, and Pigments
I have also been testing Velvet underglazes, stains, and making my own Talavera paints out of pigment and frit. As well as square test tiles, I made little goats and birds to test out these glazes.
I read online that a 50 50 mix of pigment and frit is ideal for the traditional terracotta paints I am testing.
The end result is not as bright as I expected, so I may try more pigment in the next batch.
Although the colors came out smooth and shiny, they are not as vibrant as I hoped.
I read online that a 50 50 mix of pigment and frit is ideal for the traditional terracotta paints I am testing.
The end result is not as bright as I expected, so I may try more pigment in the next batch.
Although the colors came out smooth and shiny, they are not as vibrant as I hoped.
Oxidation Fired vs Reduction Fired
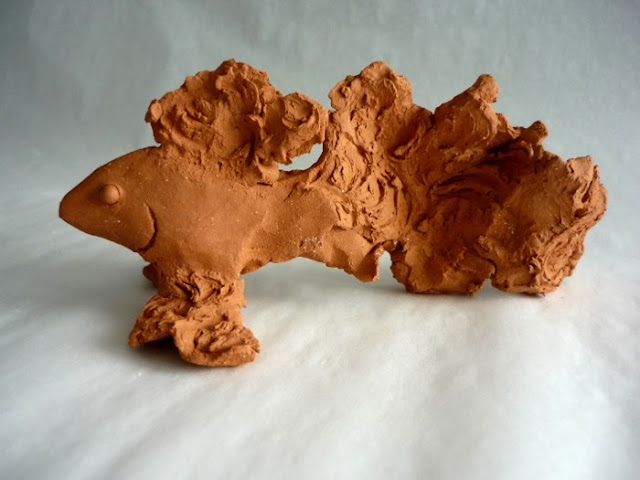
These are oxidation kiln fired, as yet I have not been able to reproduce the dark tones created in the reduction atmosphere of the gas kiln I had access to long ago.
This first image is of a Raku fish with copper oxide on both the tail and the fins, but the inside of the tail has clear glaze added to it which resulted in the beautiful blue-green color. I was pleasantly surprised since I know so little about ceramics and was not expecting to see the radical color change.

The result is disappointing. Not only am I lacking the dark and earthy tones, the texture is smooth and soft which is the opposite of what I was aiming for.
My next set of test fish will have to have the textures painted on with a tiny brush.

This first image is of a Raku fish with copper oxide on both the tail and the fins, but the inside of the tail has clear glaze added to it which resulted in the beautiful blue-green color. I was pleasantly surprised since I know so little about ceramics and was not expecting to see the radical color change.

In order to achieve the color and texture of the reduction atmosphere, I apply the same oxide stains in the same quantity as I did before. I expect the results to be similar even though this is an oxidation firing. I paint 5 test fish using Cobalt carbonate, Nickle, Copper, Manganese, Rutile, and Red Iron either on their own or mixed in equal quantities.
The result is disappointing. Not only am I lacking the dark and earthy tones, the texture is smooth and soft which is the opposite of what I was aiming for.
My next set of test fish will have to have the textures painted on with a tiny brush.

Reduction Fired
5/3/15
Electric kiln
I bought myself a small electric kiln so that I could make ceramic sculptures at home instead of taking classes at the community college. I loved those classes, but I moved too far away and driving up there has become too annoying a task. I regret not having access to a reduction kiln since I can't seem to get the lovely textures anymore, but I will not stop trying.
I have four different types of clay, Raku, White low fire, Red low fire, and mid fire Porcelain that vitrifies at cone 5. The Raku clay's texture was the main reason why I got that type of clay, I am actually too scared to try to Raku fire anything. The red clay is Terracotta and I absolutely had to try making those pretty Mexican-style designs I find all over the place... Talavera I believe it's called. The porcelain I bought because I am fascinated by the translucency of the thinner pieces in contrast to the creamy opaqueness of the thicker ones. The fish I make are test pieces, I am still at the entry level, curious and enthralled.
3/29/15
Oil Painting 3
1st draft
Re-size and block out stronger
Modeling paste... I am doing an experiment on textured canvases
Re-draw the figure
Paint the background
Paint over drawing
Add highlights
Blend them in
Not quite finished...
Subscribe to:
Comments (Atom)


